Process-editor User guide
RunaWFE Graphical Process Designer. User guide.
Version 3.0
© 2004-2011, ZAO Runa. RunaWFE is an open source system distributed under a LGPL license (http://www.gnu.org/licenses/lgpl.html).
Introduction
RunaGPD is a graphical process designer for the open source system of business process management RunaWFE. RunaGPD is a part of the open source project RunaWFE and is distrubuted free of charge under the LGPL lisence. RunaGPD can work on different platforms (Linux, Windows, etc). The desiner is free to download along with source code from the sourceforge portal http://sourceforge.net/projects/runawfe/files. This document describes how to develop business processes with the help of graphical desiner RunaGPD. RunaGPD generates .par archive files. Each .par file contains business process definition written in jPdl language. Reference documentation for jPdl language can be found at http://www.jboss.org/jbossjbpm/jpdl_documentation.
Installation guide
RunaGPD is distributed as a part of the RunaWFE system in one of the following ways:
- In a set of specialized distributives for specific operation systems
- In a java-compiled set of .zip files
- In a source files set
A distributive for the Windows OS
Insert the CD into the CD-drive or run RunaWFE-Installer.exe. Follow the instructions of the installation master that should appeare on the screen. Don't forget to check the graphical process desiner during the installation process. After the installation of RunaGPD you can run the graphical desiner via the system menu option "Start/Programs/Runa WFE/Process desiner" and via clicking the icon signed "Process desiner" on the desktop.
A distributive for Linus OS
To install graphical process desiner from rpm or deb package it is wise to use some package manager such as apt-get or yum. Usage of the package manager allows to download and install all necessary dependencies for the installing packages automatically. The graphical designer is installed with the help of runawfe-gpd package (for example, you can run apt-get install runawfe-gpd) After the installation the designer can be run via system menu or an icon signed "Process designer" on the desktop.
Java-compiled .zip files distributive variant
Required software
- JRE or JDK 5.0 or higher, can be downloaded from http://java.sun.com/j2se/1.5.0/download.jsp
- Web browser
(Note: In case of AltLinux 4.0 and Mozilla Firefox web browser for the correct work of built-in form editor you should do the following. Find the firefox.js configuration file in the folder where the Mozilla is installed (usr/lib/firefox/defaults/pref/firefox.js). In this file set Dom.disable_window_status_change to false. But if you use a specialize AltLinux distributive the change of configuration file is not necessary for the problem is solved in this distribution.
Install RunaGPD
- Install JDK (http://java.sun.com/j2se/1.5.0/install.html)
- Unpack runa-gpd-*.zip archive and go to the gpd-x.x.x directory
Running RunaGPD
- Run runa-gpd (in case of Windows run runa-gpd.exe)
Note: To run the designer in multiuser mode you should add -data option with the link to the data folder: run-gpd -data "link For example: ./runa-gpd -data "I:/MyProcesses
Building from Source
Required software
- JDK 5.0 or higher, can be downloaded from http://java.sun.com/j2se/1.5.0/download.jsp
- Eclipse IDE 3.5, can be downloaded from http://www.eclipse.org/downloads/
Install RunaGPD
- Install JRE or JDK (http://java.sun.com/j2se/1.5.0/install.html)
- Install Eclipse IDE
- Download the required version of GPD sources from the SVN repository
- Run Eclipse
- Import unpacked RUNA GPD plug-ins into you Eclipse workspace
- Run RUNA GPD plug-in using gpd.product file from org.jbpm.ui plugin.
More detailed instructions on installing RunaGPD from the source you can find in the "RunaWFE. Graphical Process Designer. Developer guide" document.
Creating new RunaGPD Project
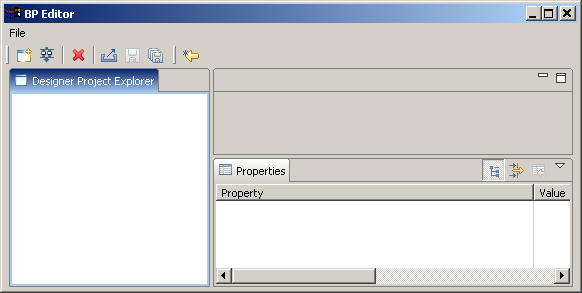
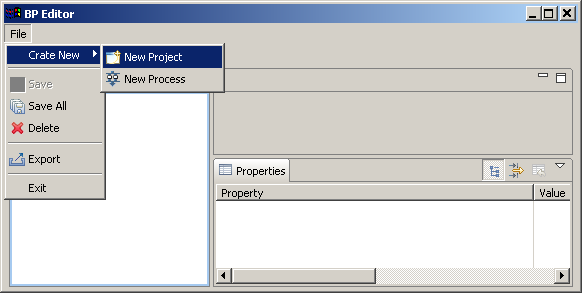
- Inside RUNA GPD select the menu item File > Create New >New Project.... to open the New Project wizard.
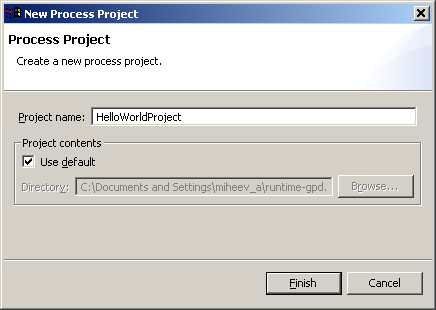
2. Enter the project name “HelloWorldProject”.
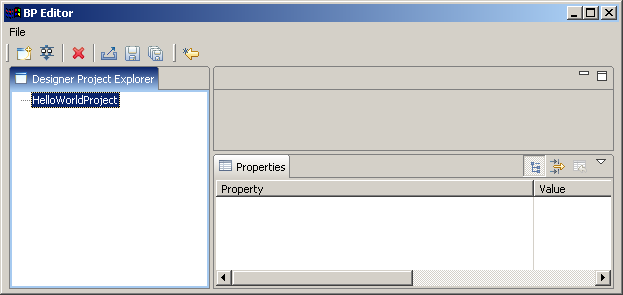
The HelloWorldProject project will be created.
Creating HelloWorld process
The process consists only of two nodes: the start-state and the stop-state.
The process scenario
- On process start HelloWorld starting form appears.
- When “complete” button on the form is pressed process immediately ends.
Process graph creation
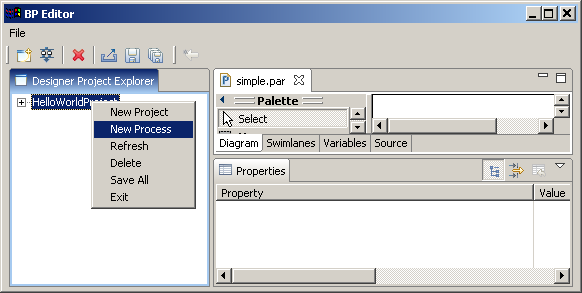
Open context menu by right mouse button clicking on HelloWorldProject, then click on New Process menu item.
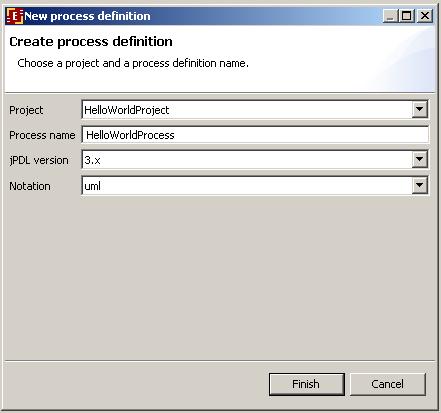
Enter HelloWorldProcess as the process name:
Click "Finish". HelloWorldProcess will be created.
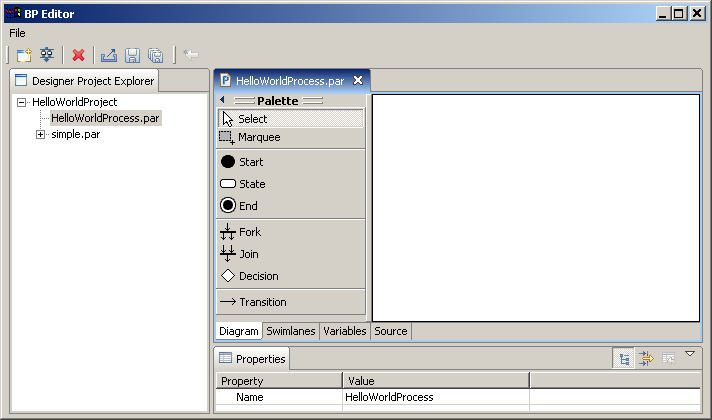
Double click on the HelloWorldProcess. The process diagram window will appear:
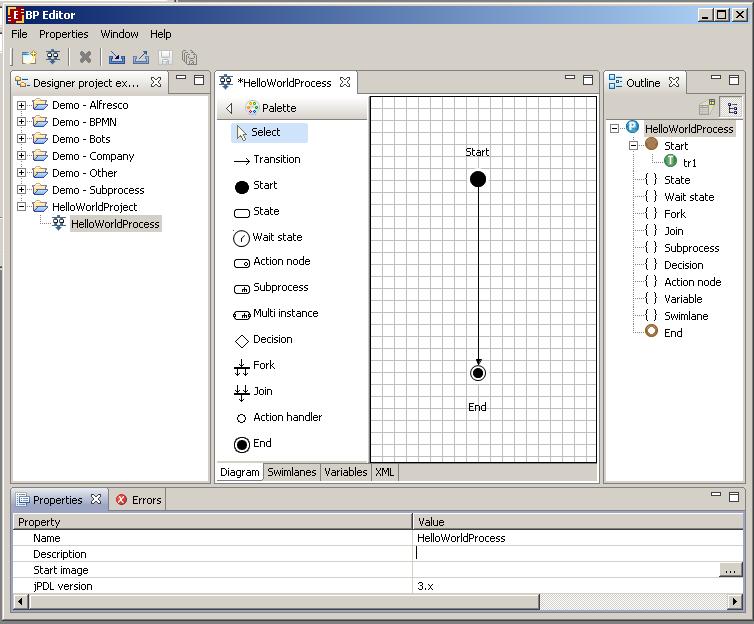
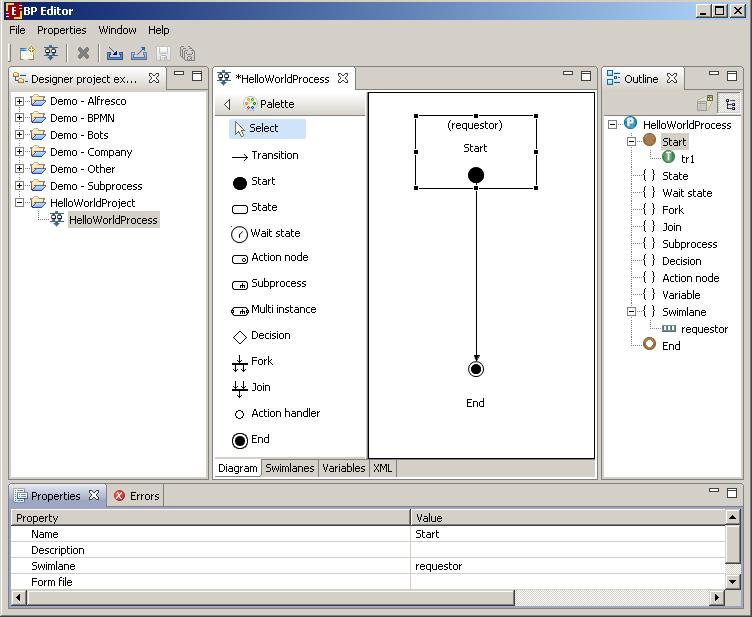
Click on menu Properties/Show Grid, the grid will appear. Click on “Start” element on the Palette, then click on diagram window. The Start state will appear on diagram window. Similarly place the End state on diagram, then click on “transition” element on the palette and connect Start and End states.
Click on menu Properties/Show Grid, the grid will disappear. In the corresponding fields of Properties tab enter a short description of the process (optional) and a icon for the process (optional). The process graph is ready.
Swimlanes creation
Introduction to swimlanes
Swimlanes corresponds to business process roles. In JBoss jBPM swimlane is a special business process variable. Every state has swimlane associated with it. The start state behavior regarding swimlane differs from the other state behavior. It doesn't use initializer. The start state fills start state swimlane with user that started the process. The end state has no swimlane associated. Other states use associated swimlanes to determine who can execute this state.
Swimlanes for HelloWorld process
The process has only start and end states, so there is a single swimlane in the process.
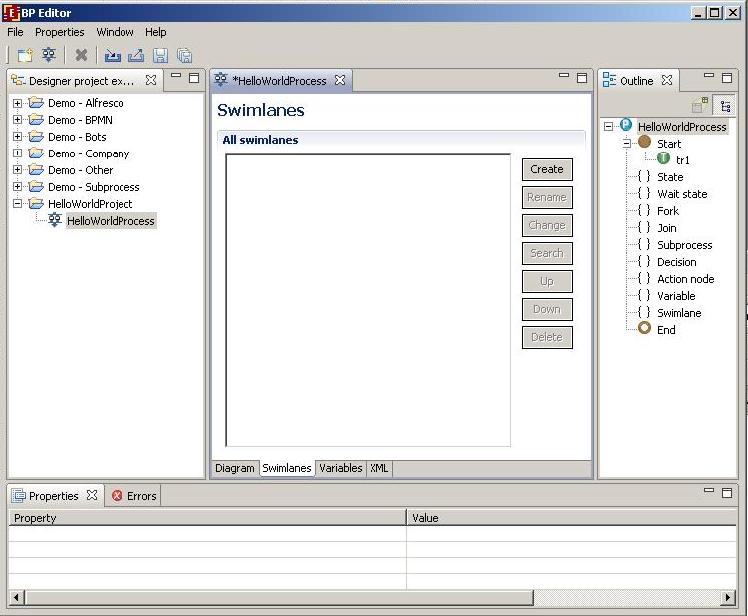
Click Swimlanes tab. You'll see the following:
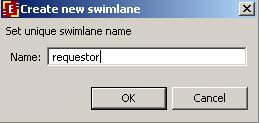
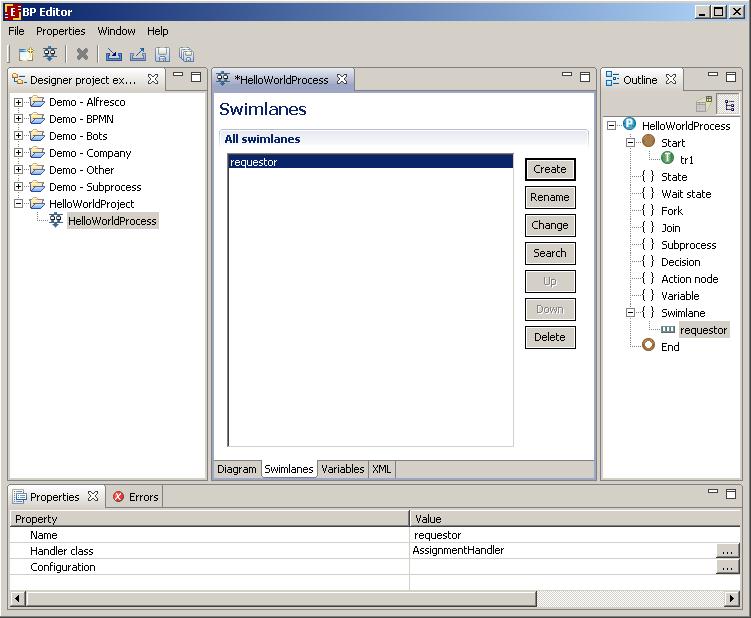
Then click Create button. The creating swimlane form will appear. Enter swimline name “requester”.
Click Ok.
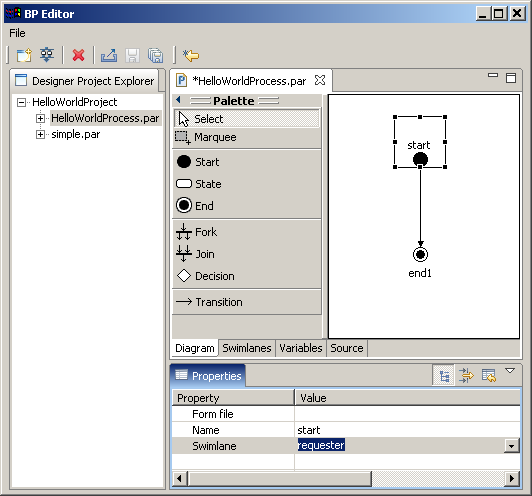
Click Diagram tab, click start state and choose “requester” as Swimlane value in properties view.
The name of the swimline will appear above the name of the task on the diagram
Graphical form creation
Forms
Every task that is not intended for a bot should have a corresponding form. HTML tags are used in forms. Plus you can use freemarker tags or special additional tags <customtag>. These tags are used to display process variables values in the form.
The <customtag> tag have the following attributes:
- var – process variable name
- delegation – name of Java class, used for the variable value rendering
Form file creation
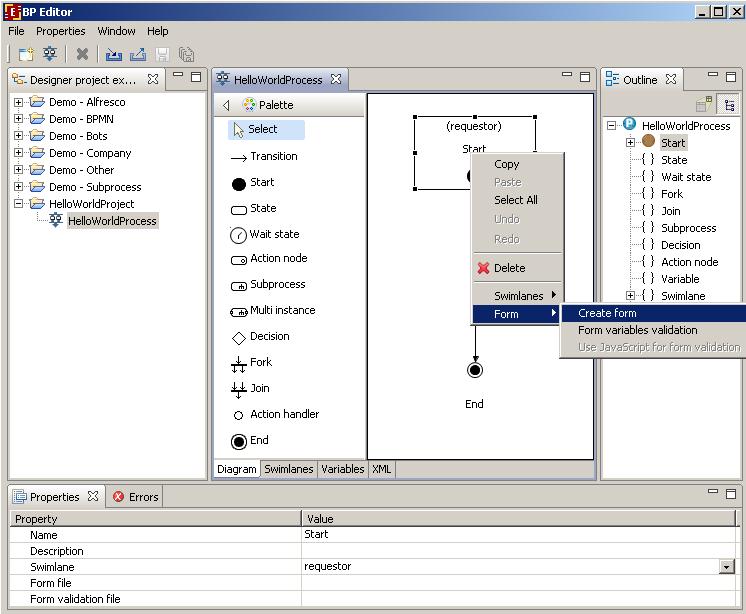
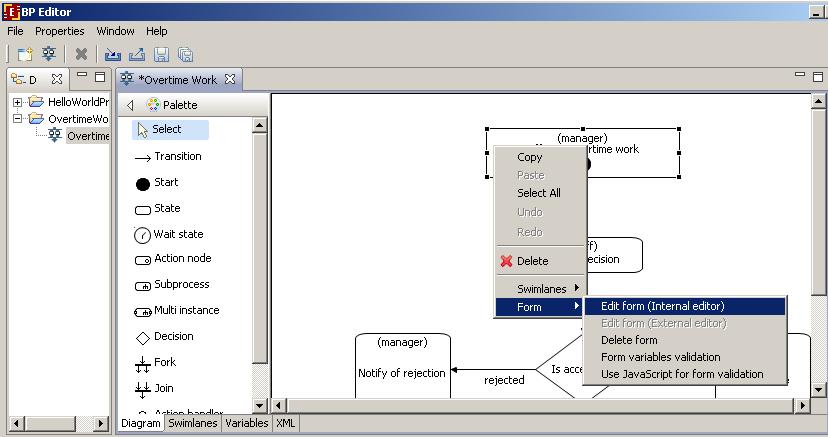
HelloWorld process has no variables and only one form – start form. Click start state by right mouse button, then click on "Form" menu item and choose "Create form" command from next level menu.
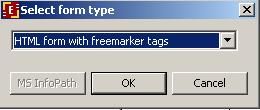
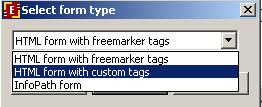
The dialog will appear. Choose form type. The recommended type is HTML form with freemarker tags.
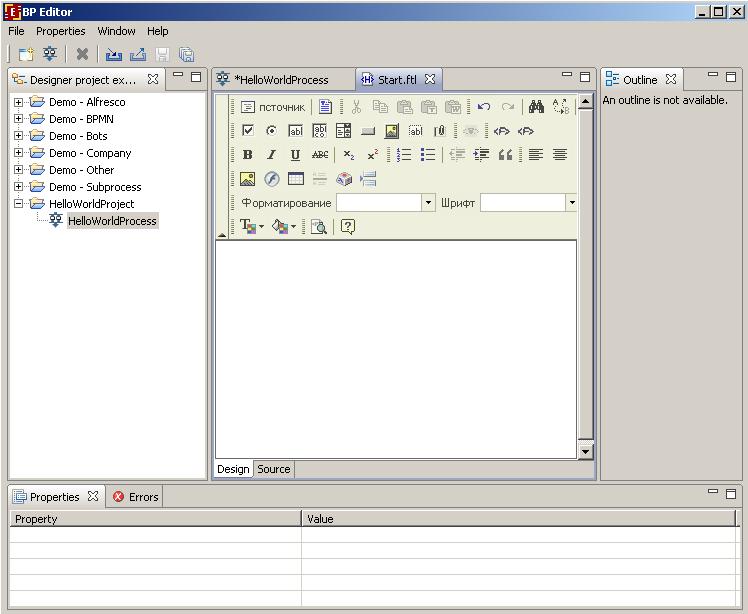
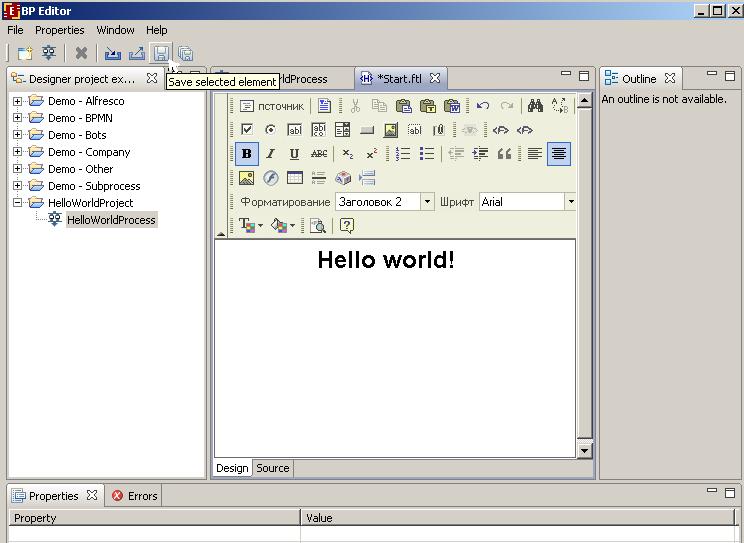
After the form editor opening click the "Design" tab.
In the form editor enter: Hello World! Choose the font, size and align.
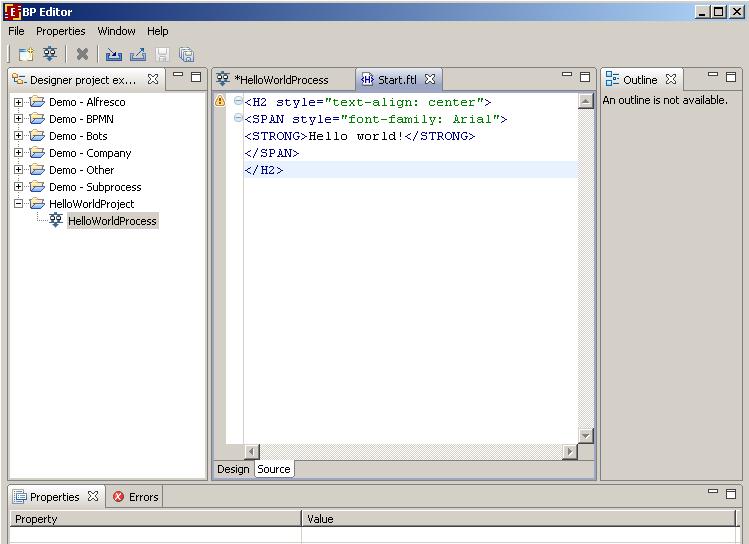
Click on "Save" icon to save you changes. Choose "Source" tab if you want to see the html code of the form.
Process definition archive creation
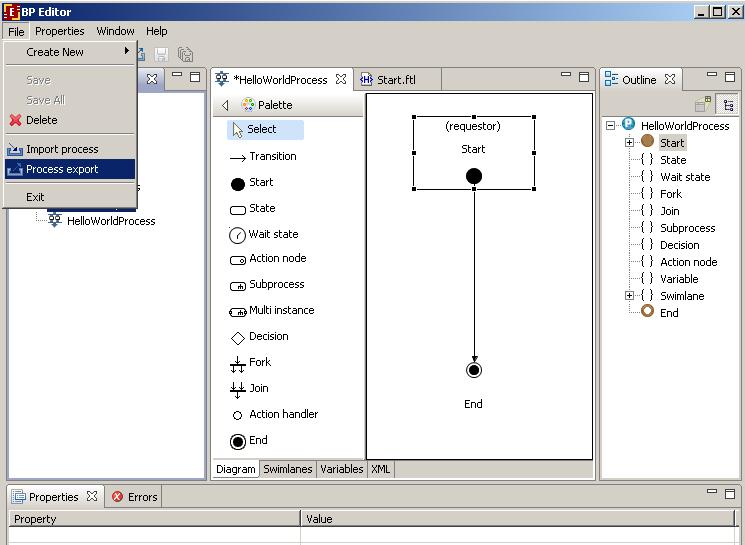
Select HelloWorldProcess, then open menu item File/Process export to create .par process archive.
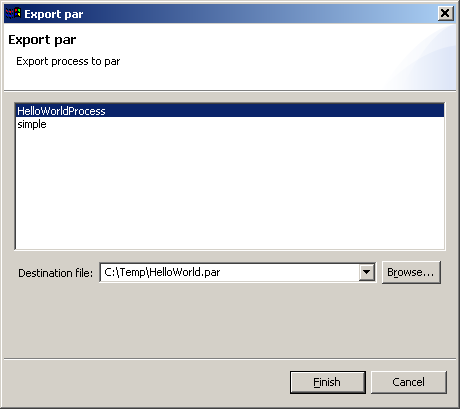
In the appeared form select HelloWorldProcess, and fill the Destination file field.
Then click “finish” button. The HelloWorld process file will be generated.
Deployment into RunaWFE environment
Login into RunaWFE web interface as Administrator (The default Administrators password is wf, see RunaWFE manual for details).
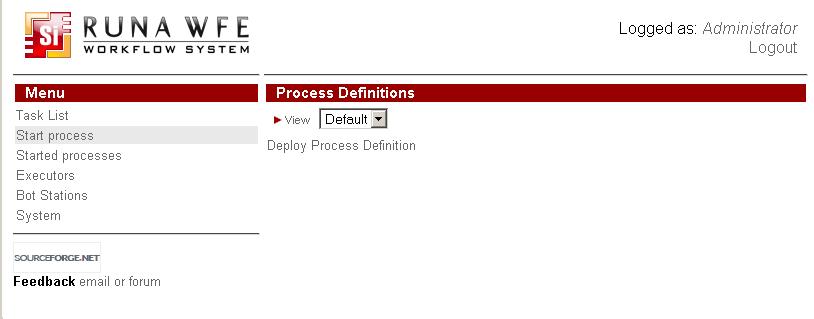
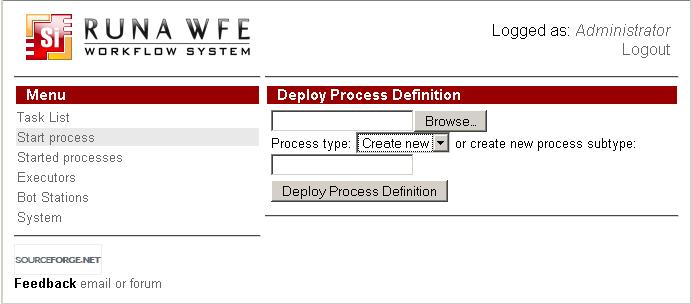
Go to “start process” menu. Press deploy process definition[1].
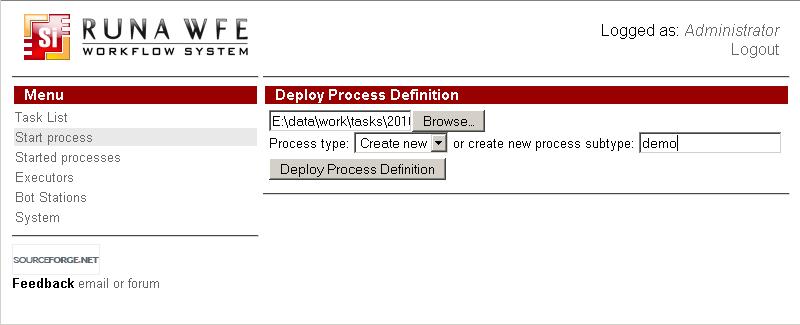
Press browse button to select process definition archive. Choose the previously formed HelloWorldProcess.par file from the file system. Then type the name of the new process type: demo. Click "Deploy process definition".
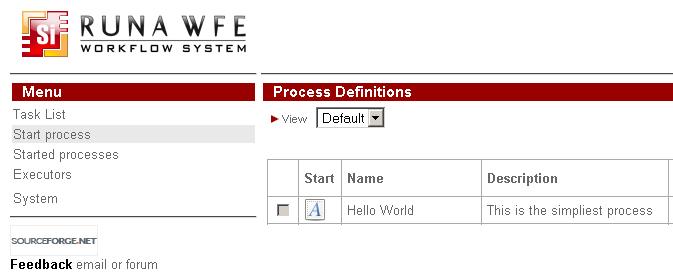
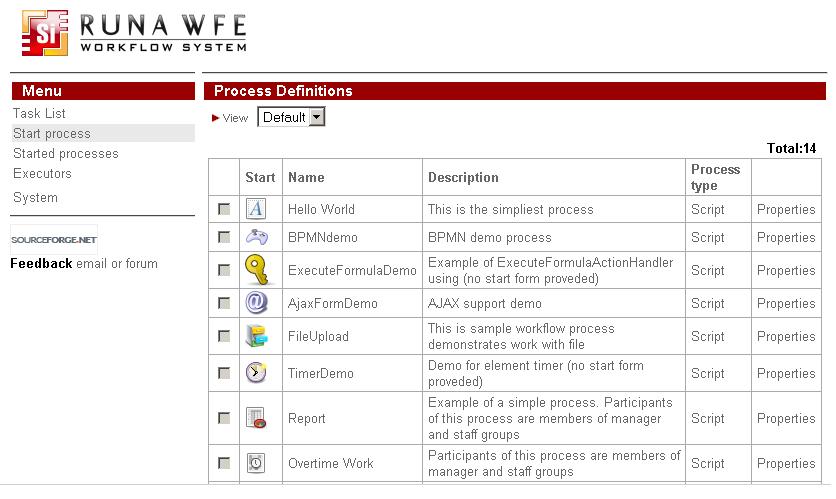
HelloWorldProcess is now deployed into the system.
Running Hello World process
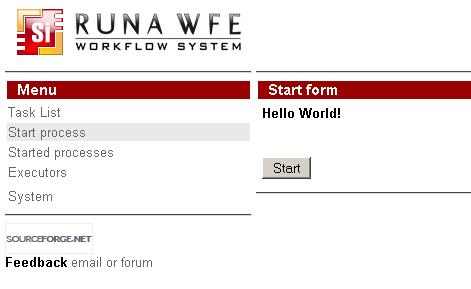
Click on process name in “start process” menu. You'll see the start form:
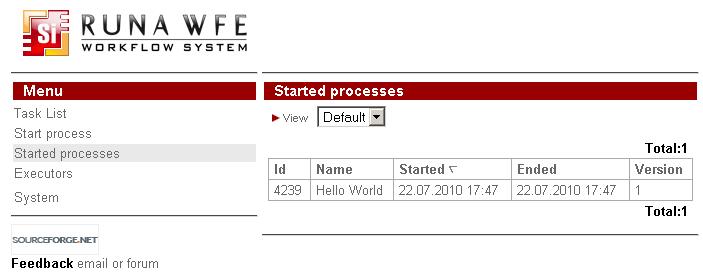
Click on “Start” button. The “Hello World” process starts and immediately ends. You can see the process instance in the “Started processes” menu:
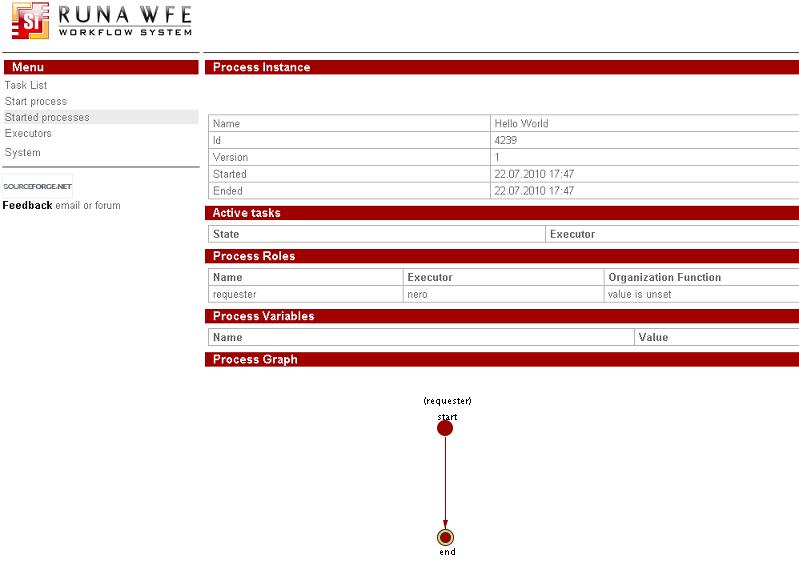
Click on the process name to view process properties:
Creating OverTime demo process
The process scenario
Manager offers an over time work to employee. Employee accepts or rejects the offer. Then manager receives the corresponding notification.
It is supposed that all managers are members of group “manager” and all employees are members of group “staff”.
Process graph creation
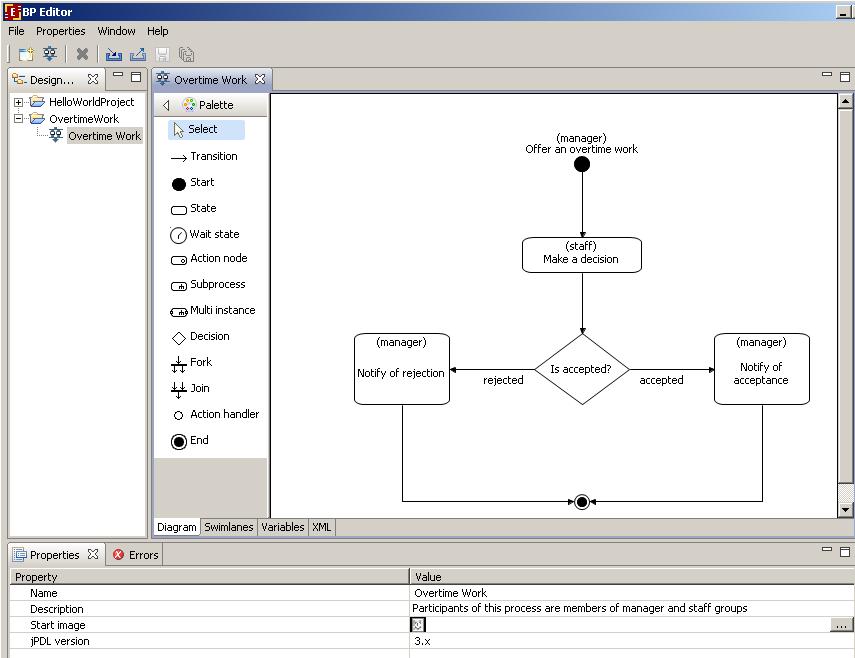
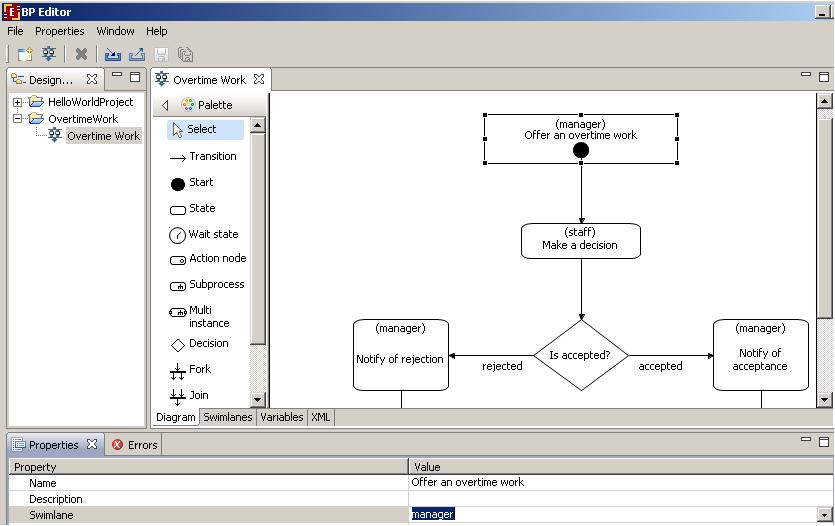
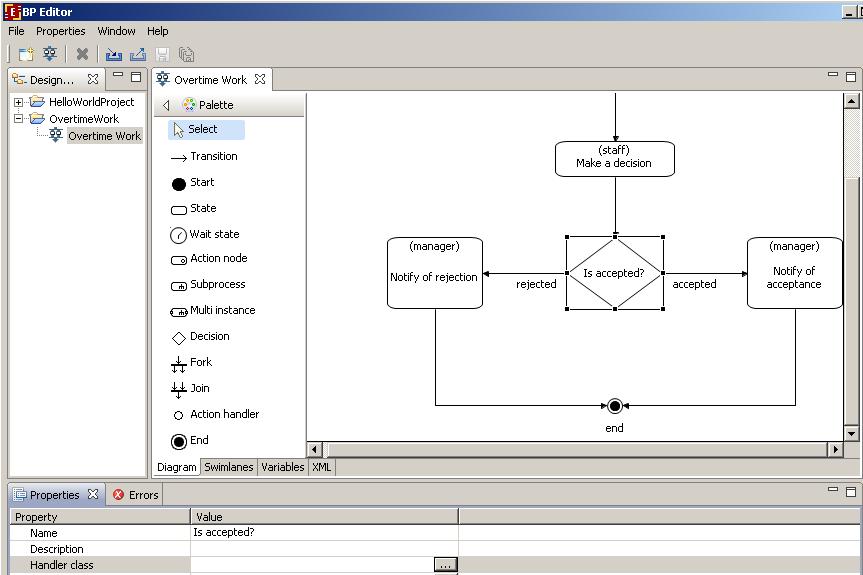
Create a new project and name it "OvertimeWork". Open context menu by right mouse button clicking on OvertimeWork project, then click on New Process command. Enter “Overtime Work” as the process name. Double click on the “Overtime Work”. The process diagram window will appear. By clicking at palette elements and process diagram window create the following graph for business process (also it is necessary to rename states (in properties view)):
To change an element name, select an element by clicking on it, then click the element once more. For transitions from the choice state "Is accepted?" enter their explicit names "accepted" and "rejected" in their properties.
Swimlanes creation
Swimlanes overview
Swimlanes behavior in StartState and EndState was described in “Creating Hello World process” section. Other states use associated swimlanes to determine who can execute the task.
Swimlane is a special type of business process variable. It may be initialized with the ID of a group or an actor at any moment of process execution. The swimlane of the node has to be initialized by the time when execution enters this node. If the current state's swimlane is initialized with the actor, then only one executor (this actor) receives task corresponding to the state. If the swimlane is initialized with the group, then all the members of the group receive task corresponding to the state. But only one member of the group is able to execute the task, the one who is the first to press "Task is done" button. After it the additional initialization will occure and the swimlane will contain not the group but this actor.
If the current state's swimlane is not initialized, then the special mechanism is used to decide who can perform the task. This mechanism is called orgfunction. Orgfunction is defined by special kind of Java class and parameters. This class on the basis of parameter values generates a list of executors who can execute the task. If an executor is in the list, the task, associated with the current state, is shown as available in his/her tasklist. The first actor who executes the task initialize swimlane with his/her ID.
There is another way to initialize swimlane. User ID can be assigned to process variable with name of swimlane. In this case orgfunction is not needed and swimlane is initialized by variable setting (e.g. via the form).
Process designer has special forms developed to work with the orgfunctions. To pass a parameter to orgfunction you should inclose it in special braces -- ${} (e.g. ${<variable name>}).
Swimlanes for OverTime demo process
Business process has two swimlanes:
- manager
- staff
Swimlanes initialization description:
| Swimlane | Initialization description |
| manager | Person, who started the process |
| staff | Person, who is chosen by manager in the Start form |
State – swimlane mappings:
| State | Associated swimlane |
| Offer an overtime work | manager |
| Make a decision | staff |
| Notify of rejection | manager |
| Notify of acceptance | manager |
Swimlanes creation
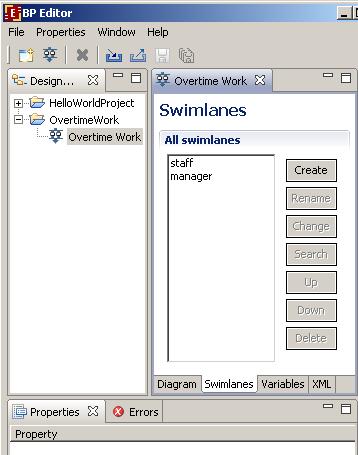
Click on “Swimlanes” tab. Use “Create” button to add “staff” and "manager" swimlanes:
Open “Diagram” tab, select “Offer an overtime work” StartState, then select “manager” in the value of Swimlane property in properties view. Select “Make a decision” State, then select staff in the value of Swimlane property in properties view. Then associate “Notify of rejection” and “Notify of acceptance” states with manager swimlane. You'll see swimlane name in round brackets at upper part of each state:
Creating variables
Variables description and initialization
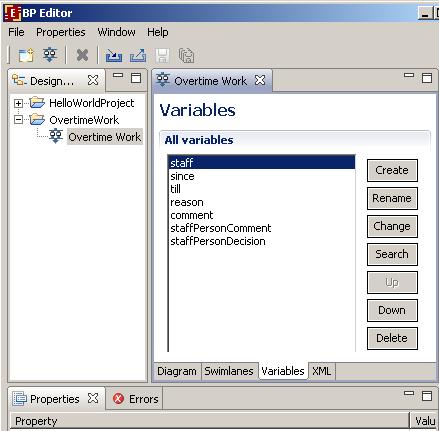
The following variables are used in the Overtime Work process:
| Variable | Type | Description |
| since | DateTime | DateTime when overtime work starts |
| till | DateTime | DateTime when overtime work ends |
| reason | String | Reason |
| comment | Text | Comment |
| staffPersonDecision | Boolean | Employee decision |
| staffPersonComment | Text | Employee comment |
Variables
- since
- till
- reason
- comment
- staff (Staff is a swimlane but it is initalized as regular variable.)
are initialized in StartState “Offer an overtime work”.
Variables
- staffPersonDecision
- staffPersonComment
are initialized in State “Make a decision”
Variables creation
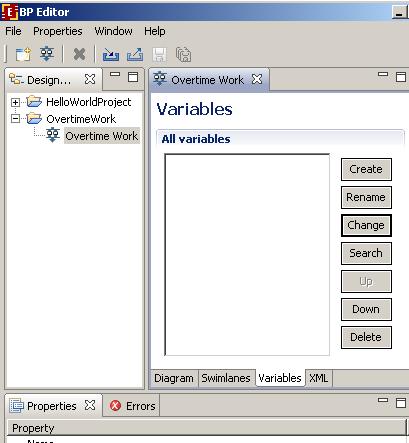
Click on “Variables” tab:
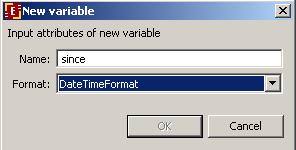
Click “Create” button, rename default variable name to “since”, choose DateTime format in the Format field:
Likewise create the other variables:
Decision formula creation
Decision formulas description
If the value of the staffPersonDecision variable is equal to "true", execution point should move to the "Notify of acceptance" state. Otherwise execution point is to move to "Notify of rejection" state.
Decision formula creation in RUNA GPD
Click “Diagram” tab. Click on the left leaving decision transition, rename it to “rejected”. Click on the right leaving decision transition, rename it to “accepted”. Select “Is accepted?” decision, then click on right hand end of Handler class:
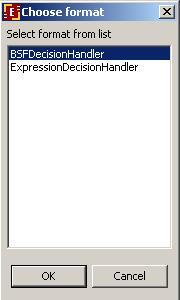
In the appeared form choose class BSFDecisionHandler
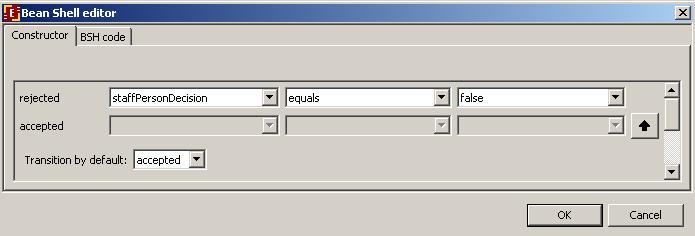
Then click “OK”. Click on right hand end of Configuration property. In the appeared window use a "Constructor" tab to set the decision conditions.
Or use "BSH code" tab to enter following BeanShell script :
if ( staffPersonDecision.booleanValue() == false ){return "rejected";}return "accepted";
Graphical forms creation
RUNA WFE forms description
State can be used for human and/or bot interaction. (Bot is a special kind of workflow application for automation/integration purpose.)
If state is used for human interaction, then a form must be associated with it. The form parsing mechanism uses HTML with additional tags <customtag> or freemarker tags. You cannot use both <customtag> and freemarker tag in the same form. <customtag> tags are used to display process variable value in the form.
The < customtag> tag have the following attributes:
- var – process variable name
- delegation – name of Java class, used for the variable value rendering (must implements ru.runa.wf.web.html.VarTag interface)
The following delegation-classes are used in “customtag” tags in forms of OverTimeWorkDemo process:
| Class | Description |
|---|---|
| GroupMembersComboboxVarTag | Generates choice of group members. There must be a variable in the business process with a name matching the name of the group. (In the OvertimeWork process the variable is "staff" to match the staff group.) The group name equals the «var» parameter of the tag. The selected actor ID is returned into the variable given in "var" parameter. |
| DateTimeInputVarTag | Generates field for DateTime input |
| ActorFullNameDisplayVarTag | Generates Actor name. «var» parameter of the tag refers to variable, containing actor ID. |
| DateTimeValueDisplayVarTag | Generates field for DateTime, showing in read only mode. |
| VariableValueDisplayVarTag | Generates field for String, showing in read only mode. |
Creating forms with the help of RUNA GPD
Click on “Offer an overtime work” state, then enter choose “Forms/Create form” in the “Form file” field.
Choose the type of form you want to create. In the following example we've chosen "HTML form with custom tags".
If the form already exists, then choose “Edit form” menu item.
Using design tab to create form
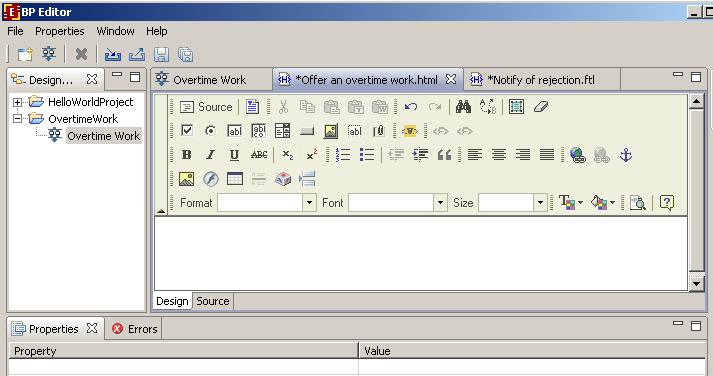
After choosing create (or edit) form option the graphical form design tab will open:
Type "Offer an overtime work". Then on the next line type "Employee *" and click the ![]() element. If you've chosen to use freemarket tags instead of custom tags, then this element would be inactive. You should use left
element. If you've chosen to use freemarket tags instead of custom tags, then this element would be inactive. You should use left ![]() element. It is useful for complex input and output tags. If you want to output value of string or date variable using freemarket tags use the right
element. It is useful for complex input and output tags. If you want to output value of string or date variable using freemarket tags use the right ![]() element.
element.
The properties of form element dialog will appear. Choose "staff" as the "form element name" and "Group Members Combobox VarTag" as the "element type". Click ok button.
In the next line of the form type "Since *", then click the ![]() element.
Choose "since" as the "form element name" and "DateTime Input VarTag" as the "element type".
Click ok button.
element.
Choose "since" as the "form element name" and "DateTime Input VarTag" as the "element type".
Click ok button.
Just in the same manner create "Till" form field in the next line.
In the next line type "Reason *", then choose ![]() text field element. Choose "reason" as the name of text field. Click ok.
text field element. Choose "reason" as the name of text field. Click ok.
In the next line type "Comment", then choose ![]() text area element. Choose "comment" as the name of text area. Click ok.
text area element. Choose "comment" as the name of text area. Click ok.
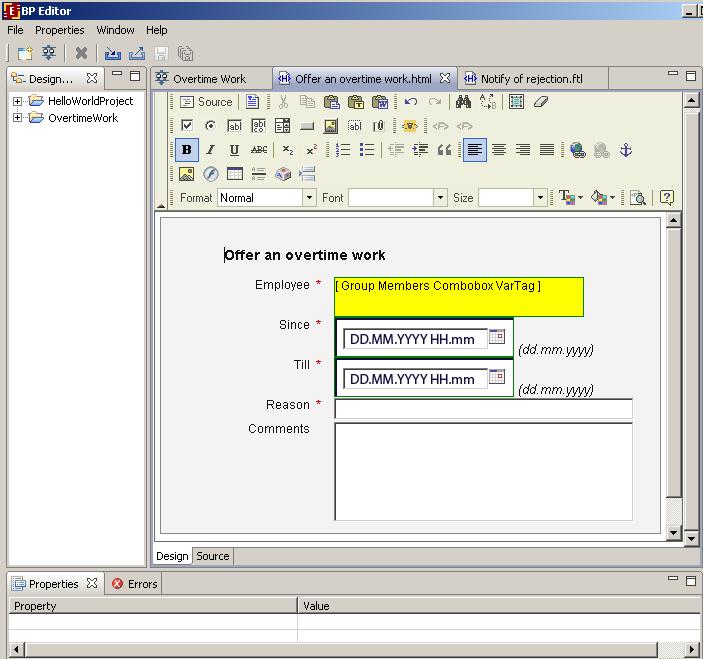
The form is ready:
Don't forget to save it. Click the save icon on the toolbar.
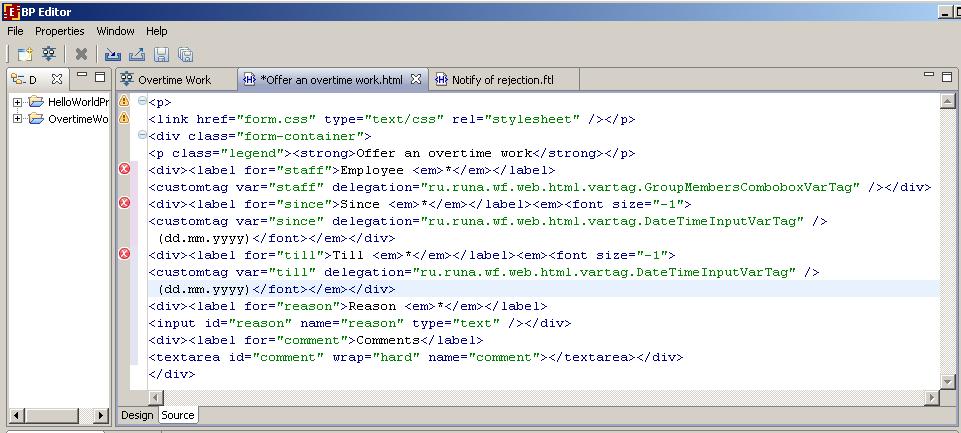
Using source tab to create form
After opening the create (edit) form panel, click source tab. Enter in the appeared window the following:
<table cellspacing="0" bgcolor="#eeeeee" style="border-style:solid;border-width:1px;border-color:black;">
    <tr>
    <th colspan="2">
        <h3>Offer an overtime work</h3>
        <hr>
    </th>
    </tr>
    <tr title="staff">
    <td align="right">
        Employee:
    </td>
    <td>
        <customtag var="staff" delegation="ru.runa.wf.web.html.vartag.GroupMembersComboboxVarTag" />
    </td>
    </tr>
    <tr title="since">
    <td align="right">
        DateTime since (dd.mm.yyyy hh:mm):
    </td>
    <td>
        <customtag var="since" delegation="ru.runa.wf.web.html.vartag.DateTimeInputVarTag" />
    </td>
    </tr>
    <tr title="till">
    <td align="right">
        DateTime till (dd.mm.yyyy hh:mm):
    </td>
    <td>
        <customtag var="till" delegation="ru.runa.wf.web.html.vartag.DateTimeInputVarTag" />
    </td>
    </tr>
    <tr title="reason">
    <td align="right">
        Reason :
    </td>
    <td>
    <INPUT TYPE="text" NAME="reason">
    </td>
    </tr>
    <tr title="comment">
    <td align="right">
        Comment :
    </td>
    <td>
        <textarea name="comment"></textarea>
    </td>
    </tr>
</table>
Click “Save” icon on the toolbar.
Other forms of Overtime Work process
The content of “Make a Decision” form is the following:
<table cellspacing="0" bgcolor="#eeeeee" style="border-style:solid;border-width:1px;border-color:black;">
    <tr>
    <th nowrap="true" colspan="2">
        <h3> Accept or decline the offering of over time work</h3>
        <hr>
    </th>
    </tr>
    <tr title="manager">
    <td nowrap="true" align="right">
        manager:
    </td>
    <td nowrap="true" >
        <customtag var="manager" delegation="ru.runa.wf.web.html.vartag.ActorFullNameDisplayVarTag" />
    </td>
    </tr>
    <tr title="staff">
    <td nowrap="true" align="right">
        staff persone (employee):
    </td>
    <td nowrap="true" >
        <customtag var="staff" delegation="ru.runa.wf.web.html.vartag.ActorFullNameDisplayVarTag" />
    </td>
    </tr>
    <tr title="since">
    <td nowrap="true" align="right">
        DateTime since:
    </td>
    <td nowrap="true">
        <customtag var="since" delegation="ru.runa.wf.web.html.vartag.DateTimeValueDisplayVarTag" />
    </td>
    </tr>
    <tr title="till">
    <td nowrap="true" align="right">
        DateTime till:
    </td>
    <td nowrap="true">
        <customtag var="till" delegation="ru.runa.wf.web.html.vartag.DateTimeValueDisplayVarTag" />
    </td>
    </tr>
    <tr title="reason">
    <td nowrap="true" align="right">
        Reason:
    </td>
    <td nowrap="true">
        <customtag var="reason" delegation="ru.runa.wf.web.html.vartag.VariableValueDisplayVarTag" />
    </td>
    </tr>
    <tr title="comment">
    <td nowrap="true" align="right">
        Comment:
    </td>
    <td nowrap="true">
        <customtag var="comment" delegation="ru.runa.wf.web.html.vartag.VariableValueDisplayVarTag" />
    </td>
    </tr>
    <tr title="staff person comment">
    <td nowrap="true" align="right">
        staff person comment:
    </td>
    <td nowrap="true">
        <textarea name="staff person comment">
        <customtag var="staff person comment"
                    delegation="ru.runa.wf.web.html.vartag.VariableValueDisplayVarTag" />
        </textarea>
    </td>
    </tr>
    <tr>
    <td nowrap="true" align="right" colspan="2">
        <hr>
        <input type="radio" name="staffPersonDecision" value="true" checked/> Accept
        <input type="radio" name="staffPersonDecision" value="false"/> Decline
    </tr>
</table>
The content of “Notify of Rejection” form is the following:
<table cellspacing="0" bgcolor="#eeeeee" style="border-style:solid;border-width:1px;border-color:black;">
        <tr>
        <th nowrap="true" colspan="2">
            <h3>OverTime work – declined</h3>
            <hr>
        </th>
        </tr>
        <tr title="manager">
        <td nowrap="true" align="right">
            manager:
        </td>
        <td nowrap="true" >
            <customtag var="manager" delegation="ru.runa.wf.web.html.vartag.ActorFullNameDisplayVarTag" />
        </td>
        </tr>
        <tr title="staff">
        <td nowrap="true" align="right">
            staff persone (employee):
        </td>
        <td nowrap="true" >
            <customtag var="staff" delegation="ru.runa.wf.web.html.vartag.ActorFullNameDisplayVarTag" />
        </td>
        </tr>
        <tr title="since">
        <td nowrap="true" align="right">
            DateTime since:
        </td>
        <td nowrap="true">
            <customtag var="since" delegation="ru.runa.wf.web.html.vartag.DateTimeValueDisplayVarTag" />
        </td>
        </tr>
        <tr title="till">
        <td nowrap="true" align="right">
            DateTime till:
        </td>
        <td nowrap="true">
            <customtag var="till" delegation="ru.runa.wf.web.html.vartag.DateTimeValueDisplayVarTag" />
        </td>
        </tr>
        <tr title="reason">
        <td nowrap="true" align="right">
            Reason:
        </td>
        <td nowrap="true">
            <customtag var="reason" delegation="ru.runa.wf.web.html.vartag.VariableValueDisplayVarTag" />
        </td>
        </tr>
        <tr title="comment">
        <td nowrap="true" align="right">
            Comment:
        </td>
        <td nowrap="true">
            <customtag var="comment" delegation="ru.runa.wf.web.html.vartag.VariableValueDisplayVarTag" />
        </td>
        </tr>
        <tr title="staff person comment">
        <td nowrap="true" align="right">
            staff person comment:
        </td>
        <td nowrap="true">
            <customtag var="staff person comment" delegation="ru.runa.wf.web.html.vartag.VariableValueDisplayVarTag" />
        </td>
        </tr>
</table>
Form “Notify of Acceptance” differs from the form “Notify of Rejection” only by the header:
“OverTime work – accepted” instead of “OverTime work – declined”.
Form variables validation
Form elements might require input or be optional. Also there can be global validation restrictions for a set of form elements. E.g. "StartDate" must be earlier than "StopDate". Besides there can be type specific restrictions: more or less than a given number for numeric type, the length of string limit for strings, etc.
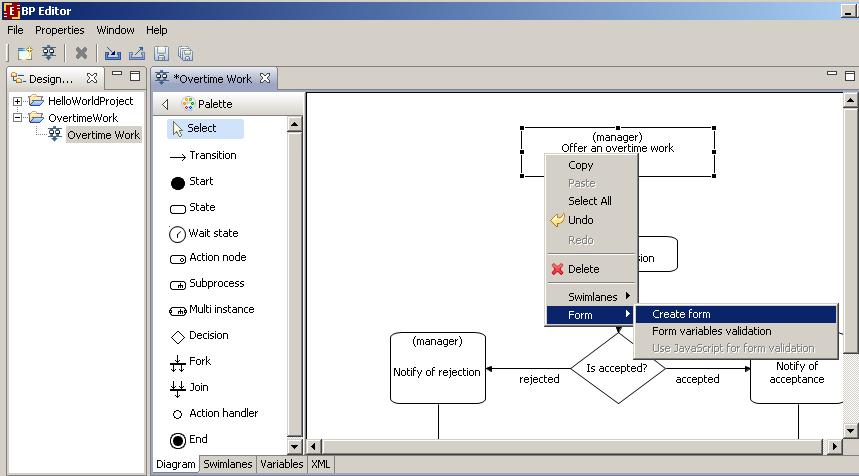
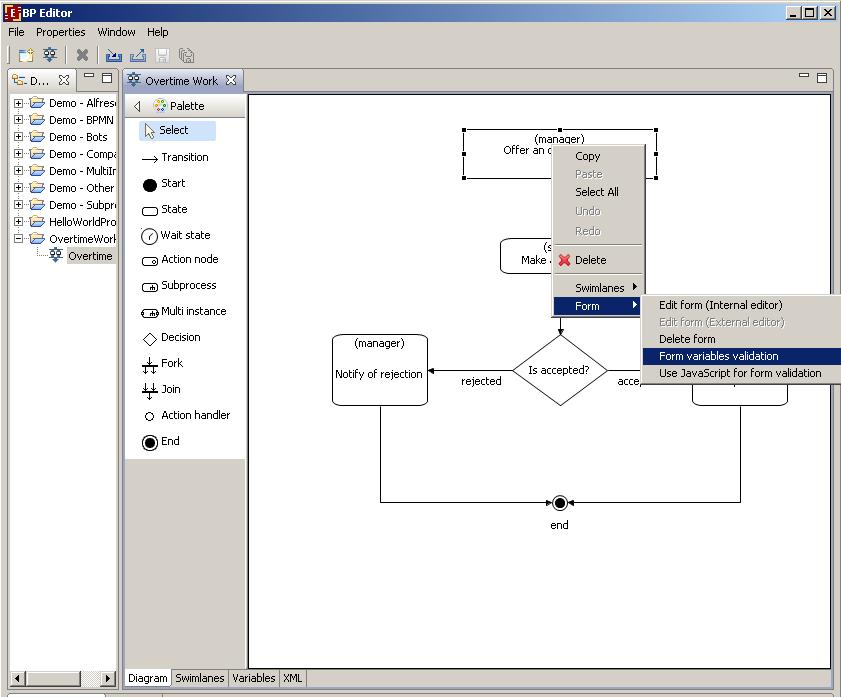
To set validation for "Offer an overtime work" form right click the state on the graph and choose Form -> Form variables validation from the popup menu.
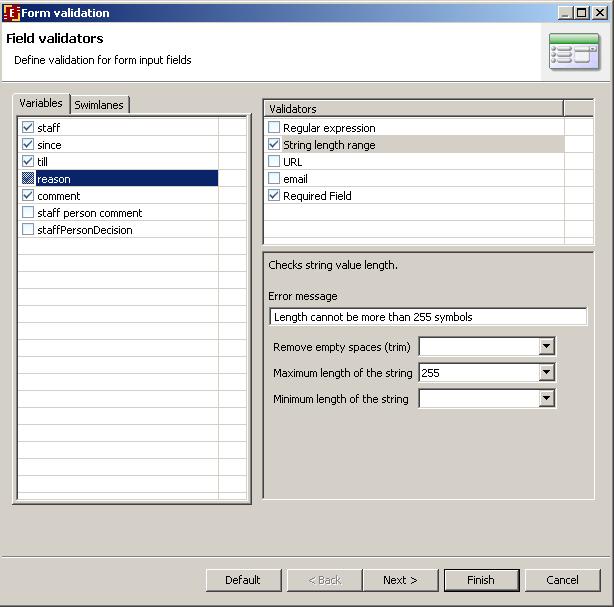
There is a list of all business process variables in the appeared window. The variables that are used in the current form are marked. In "Validators" window to the right, there is a list of the supported validators For a selected variable. Select a validator to see (and edit) the validation parameters in the window below validators list.
In the above example the maximum length of string is set to 255 symbols, and error message is "Length cannot be more than 255 symbols".
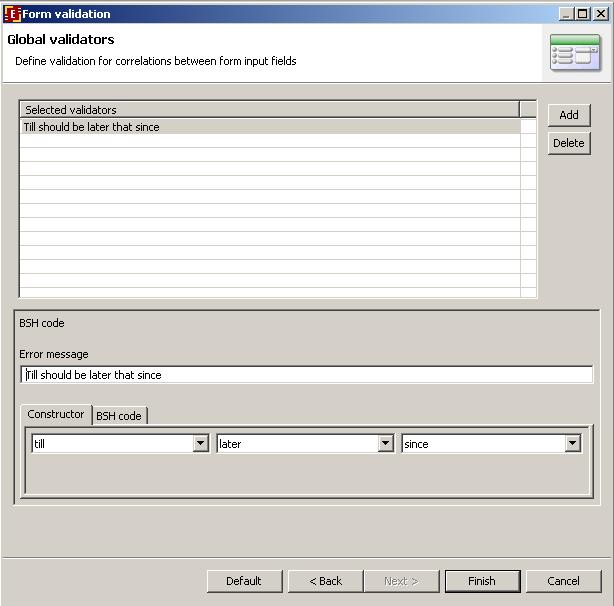
If it is necessary to check a group of values then after setting all validations on one of the fields click "Next". In the appeared form you can set global validation of the variables. For example:
Note. If validation rules contain errors the process will not export. If there are only warnings in the validation rules the process export will work.
Error types with forms:
- No form validation file found. (While the form file is present) - ERROR
- No form variable found in process variables - ERROR
- No form variable found in the validation file - WARNING
- No validation variable found in the form - WARNING
Note. Validation cannot be set on Infopath forms.
Process definition archive file creation
The export of "Overtime Work" process into the .par file is completely similar to that of "HelloWorldProcess". Note that in order to run "Overtime Work", you should previously create groups of users
- manager
- staff
- all
, add users to those groups and grant corresponding rights in Workflow system. (See Running Overtime Work Demo process).
Creating process with subprocess
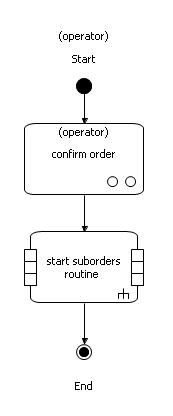
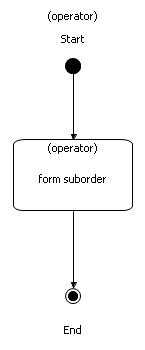
Demo MainProcess and SubProcess are created to illustrate the work with subprocesses.
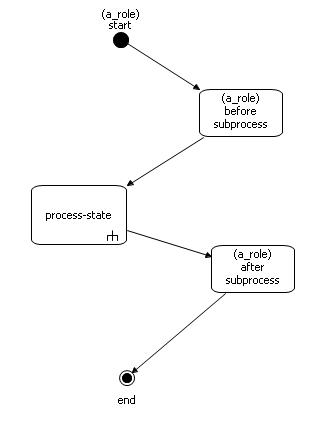
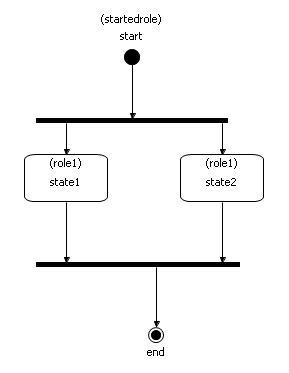
Here are demo process graphs (MainProcess to the left, SubProcess to the right).
The MainProcess graph contains a "process-state" with a special mark in the right bottom corner of the state rectangular. This is the subprocess mark. To add suprocess state to a graph drag and drop it from the palette.
Before setting the connection between a main process and a subprocess it is recommended to create the subprocess first. A subprocess itself is nothing different from regular process. Any process can be used as subprocess. So subprocesses can be independent processes or be dependent on parent process context and useless without it. One and the same process can be used as subprocess in several different processes.
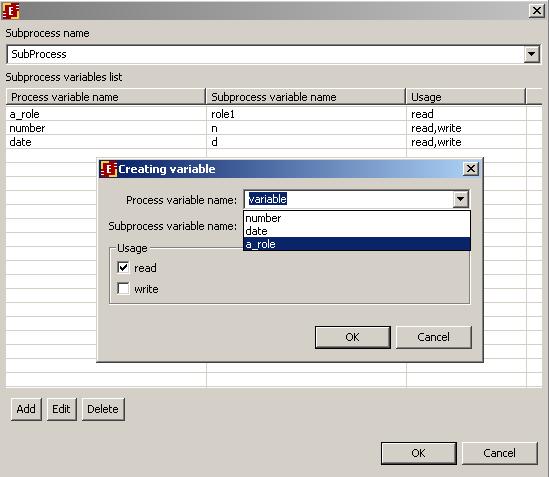
When the control reaches the subprocess state a new subprocess instance starts, but the start form of subprocess is not shown. Instead parent process variables values are passed into subprocess variables. To set the variables mapping right click the subprocess state and choose "Subprocess" from drop down menu. The subprocess settings dialog will appeare:
Firstly, choose the subprocess name from the list of all processes from all open projects. Then add variables mapping one by one and set the right usage. Roles mapping doesn't differ from variables mapping and is set the same way. If "read" usage is set then the parent process variable value will be copied the corresponding subprocess variable. If "write" usage is set then after the subprocess is over the subprocess variable value will be copied to the corresponding parent process variable. You can set both usages as well.
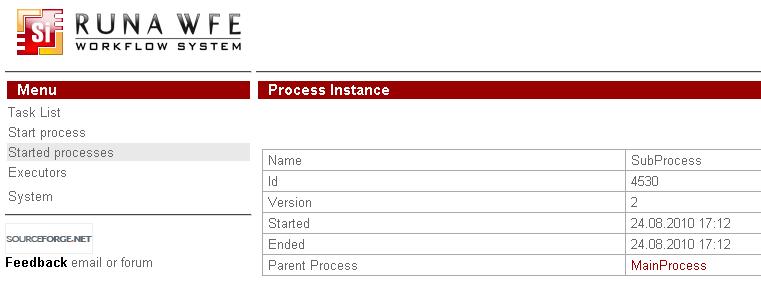
After the instance of MainProcess reaches the subprocess state you can navigate to the corresponding SubProcess instance properties by clicking subprocess state on the graph. To return to the parent process instance properties from the subprocess click the name of the parent process in the properties list:
One process can contain several subprocesses. There can be subprocesses inside subprocesses.
Creating process with multi-instance
Demo MultiInstanceProcess and MultiInstanceSubProcess are created to illustatrate how to work with multi-instances.
Here are the process graphs: (MultiInstanceProcess to the left and MultiInstanceSubProcess to the right):
When the MultiInstanceProcess reaches multi-instance state several MultiInstanceSubProcess instances are started. The number of started subprocess instances matches the multi-instance variable array length. Multi-instance variable can have any name, but should be of StringArrayFormat type.
The mapping between parent process MultiInstanceProcess and subprocess MultiInstanceSubProcess is set just like in the regular subprocess case. The only difference is the required presence of the multi-instance variable in the mapping. The multi-instance variable should correspond to subprocess variable that would contain a value of the multi-instance array element. (For each array element there is a subprocess.) If in the multi-instance variable mapping the usage is set to "write", then after all the subprocess are over the values of the corresponding variable will be copied to the multi-instance array.
In the above mapping example "addressArray" is the multi-instance variable. The corresponding variable of the subprocesses is "address". In the "start suborder routine" state there will be as many subprocesses started as the number of address in the "addressArray". Each subprocess will have its own address variable value.
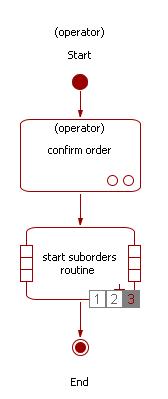
To navigate to the multi-instance subprocess instance properties click a little squire with a number in the parent process graph. The number of the little squires matches the number of subprocess instances started.
The way to get back to the parent instance properties is the same as for the regular process subprocess.
Using ActionHandlers
In the RunaWFE system you can execute java code on certain business process event (e.g. the execution passes certain transition). Java code must be put into the execute() method of a class that implements ActionHandler interface. This class must be added to the system. (See @@... how to add ActionHandler)
To bind an ActionHandler to a transaction in the graphical designer do the following:
- check the "Show actions" item in the upper properties menu.
- click on "Action handler" in the Palette. Move the cursor over the transition you've chosen to place the action handler on and click the left mouse button. A little circle will appear on the transition line graph.
- Choose the "Select" element in the Palette and select the created action handler circle on the graph.
- Edit the properties of the action handler. Choose the ActionHandler class - click the right hand end button and select action handler name from the appeared list. Then enter the configuration if it's necessary.
If you want to remove the action handler from the process, select it on the graph and then press delete key.
BSHActionHandler
This action handler is used to recount the values of business process variables. You must provide valid BeanShell code (See www.beanshell.org for syntax details) in the configuration for the BSHActionHandler. BeanShell code is very similar to Java code and a call to Java can be made from it.
Configuration examples:
My_date = new java.util.Date();
My_rnd = new java.util.Random(1000).nextInt();
My_time = java.lang.System.currentTimeMillis();
int n = Integer.parseInt(multNumber);
String[] array = new String[n];
for (int i=0; i < n; i++){
    array[i] = "book "+i;
};
multArray = array;
The variables that changed their values in the configuration script would change in the business process. Note that only those variables that have already existed in the business process before the BSHActionHandler is called will be changed. No new variables will be created.
ExecuteFormulaActionHandler
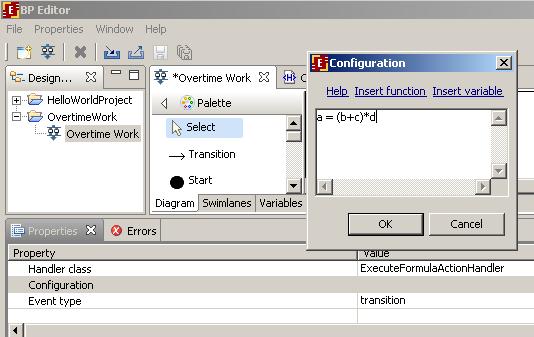
ExecuteFormulaActionHandler is also used to change the business process variables values. In the configuration for this action handler you can write various formulas: 'variable name' = expression
Configuration example:
a = (b+c)*d
Here we change the value of the "a" variable. If the "a" variable doesn't exist it will be initialized. "b","c","d" variables must be set previously somewhere in the business process.
There is "help" option with the description of available formula elements in the ExecuteFormulaActionHandler Configuration window.
You can use the following operations in the expression: *,/, +,-, <,<=,==,!=,>,>=, &,|,^. Multiply and divide operation have the highest (4) priority level. Plus and minus have priority level of 3. Next priority level have the comparison operations. Boolean operations & (and), | (or), ^ (xor) have the lowest priority level.
If the variable name contains space character, you should enclose the name in the single quotes. Along with the variables you can use values of Long, Double, Boolean, String, Date types as well as functions.
You can use some of the following functions:
date(someDateVariable) - to round the date to the day value, discarding time part of the date.
time(someDateVariable) - leaves only time, discarding the days
current_date() - returns the current date
current_time() - returns the current time
current_date_time() - returns both
hours_round_up(numberOfMinutesVariable) - rounds up the time in minutes to the hours number.
round(number) or round(number, numberOfDecimalPlaces) - rounds off the number leaving the fixed number of decimal places.
round_up(number) or round_up(number, numberOfDecimalPlaces) - rounds up the number
round_down(number) or round_down(number, numberOfDecimalPlaces) - rounds down the number
get_instance_id() - returns the instance id number of the current instance
There are also functions that are specific for the Russian language. (See the russian version of this document).
SQLActionHandler
SQLActionHandler is used perform sql operation on data base data. You can read data from db into business process variables or write values of business process variables into db. You can perform several queries in one SQLActionHandler
Creating SQLActionHandler
- Check "show handlers" option to be active in upper properties menu.
- Choose "action handler" from the palette menu. Place a new action handler on a chosen transition. Select created action handler circle in the graph.
- Choose SQLActionHandler as handler class in the properties tab below the graph.
- Create configuration for the handler: open the configuration dialog by pressing a right hand side button in the properties tab below the handler class line.
Configuring SQLActionHandler
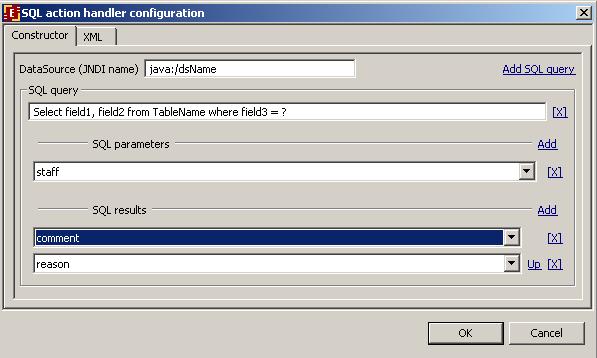
The configuration window:
DataSource (JDNI name) is the name of datasource registrated on the application server where the business process will be instantiated. The usual prefix for jboss appserver is java:/
Press Add SQL query link to add new sql query:
SQL query contains a parametrized SQL query line, mapping of SQL parameters to business process variables and mapping of the SQL result to the business process variables. Mind that the quantity of the query parameters (marked with ?) in the query line must exactly match the number of variables you add in "SQL parameters". And the number of enumerated table columns in the query line must match the number of SQL result variables.
AssignSwimlaneActionHandler
It is used to assign and reassign swimlane in any moment in the process according to a given configuration. @@Configuration info@@
SendEmailActionHandler
It allows to send task form via email. This action handler will work correctly only if it is placed on a process state (not on transition). Action handler configuration file must be placed on JBoss WFE server in the folder ...server/default/conf/ActionHandlers. The name of this configuration file (without extension (.properties)) must be set during action handler configuration in GPD. (For example, if file is ...server/default/conf/ActionHandlers/myEmailConfs.properties, in GPD in action handler parameters you should write ActionHandler.myEmailConfs)
An example of myEmailConfs.properties
smtp.server=111.16.100.5
from=user@aaa.bbb.ru
#subject=
to=<customtag var="__currentTokenExecutor__" delegation="ru.runa.wf.web.html.vartag.UsersEmailVarTag" />
#smtp.user=
#smtp.password=
WFUser=Administrator
WFUserPass=wf
#authReq=false
smtp.SendNotifiction=false</nowiki>
#content.type=text/html
content.type=text/plain
#email.template=/emailTemplates/emailTemplate.xml
ActorNameActionHandler
Allows to add employee login or full name to the process instance variables by code or login. To set action handler parameters use convenience form in GPD.
In that form you should choose the variable with the employee code or login as input values for the action handler. Then you should choose the result data format:
- name - for employee login
- full name - for employee full name
You should also choose the name of the variable to which the result value is saved.
How to add class names of swimlanes, variables formatters, action and decision handlers into graphical designer
Place .jar-files with corresponding classes into subfolder of /plugins/org.jbpm.core_3.0.1/lib that contains business process designer. Restart GPD. Note: if a .jar-file depends on third-side libraries, they should be put along with the .jar file into the same folder. Note: Sometimes JDT cache prevents new elements from appearing. If after adding .jars and restarting you still don't see new elements in GPD, close GPD, then remove folder: $GPD_home/workspace/metadata/.plugins/org.eclipse.jdt.core and restart GPD.
How to initialize swimlanes
Initializing swimlane with the help of ExecutorByName function
Swimlane initialization function ExecutorByName, as its name states, initializes swimlane with the executor (an actor or a group) whose name is passed as a parameter into this function.
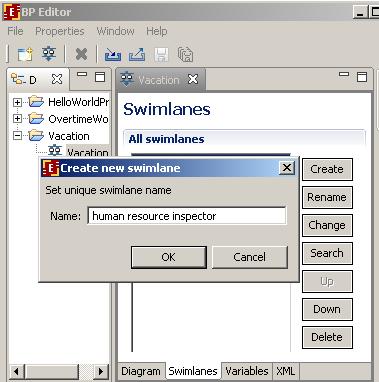
As an examle let's create a new swimlane "human resource inspector" in "Vacation" demo-process. Open Vacation process in GPD. On the swimlane tab click create button. Type "human resource inspector" as the new swimlane name. Click Ok.
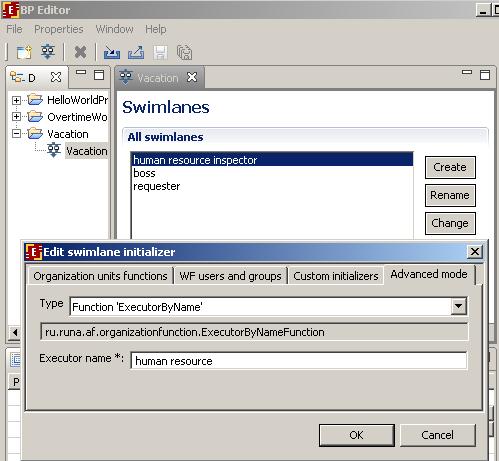
Select the role name from the list, then click "change" button, in the appeared dialog choose "Advanced mode" tab. Choose type "Function 'ExecutorByName'". As the executor name parameter enter "human resource". Click Ok. The new swimlane initializer is defined now.
Initializing swimlane with a function that takes a business process variable as a parameter
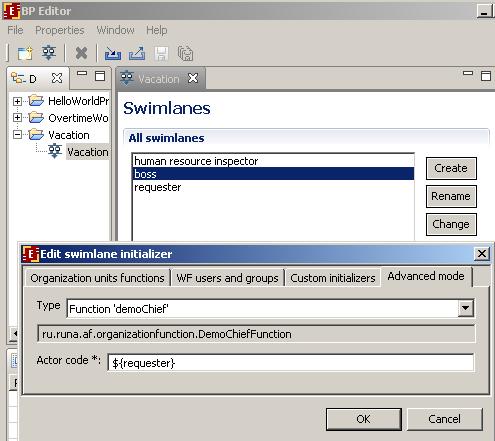
Let's create a swimlane initializer for "boss" role in the "Vacation" demo-process. Open "Vacation" process in GPD. On the swimlane tab window click "create" button. In the appeared dialog type "boss" for the name of new swimlane. Click Ok. Select the "boss" swimlane in the list and click "change" button. Select "Advanced mode" tab. Choose type "Function 'demoChief'" and type ${requester} as actor code. Thus the demoChief function will be used to initialize the boss swimlane and the paramenter of the function will be the value of the business process variable named "requester".
Note: when you using the value of the business process variable as swimlane initialization function parameter always use the syntax ${variable_name}.
Deployment in JBoss jBPM engine via RunaWFE environment
Login into RunaWFE web interface as Administrator (The default Administrators password is wf, see RunaWFE 2.0 manual@@ for details).
Go to “Start process” menu.
Press "deploy process definition" (Note:In order to deploy a process you must have Process Definition permission on System (can be granted via system menu).)
Press browse button to select process definition archive (.par). Choose where you want to place new process definition in the deployed process tree. You can create new root process type by choosing "create new" in the dropdown menu and then typing type name in the text field. Or you can choose an existing top level process type and add a subtype to it by typing subtype name in the text field. You can use already existing type or subtype by choosing it from the process type dropdown element and leaving the text field empty.
Press "Deploy Process Definition" button.
After deployment the process definition appears in the process list:
Running Overtime Work Demo process
Groups and actors creation
Before running the process create actors and groups of actors:
| Group | Group members |
| manager | nero |
| staff | attila |
| all | nero
attila |
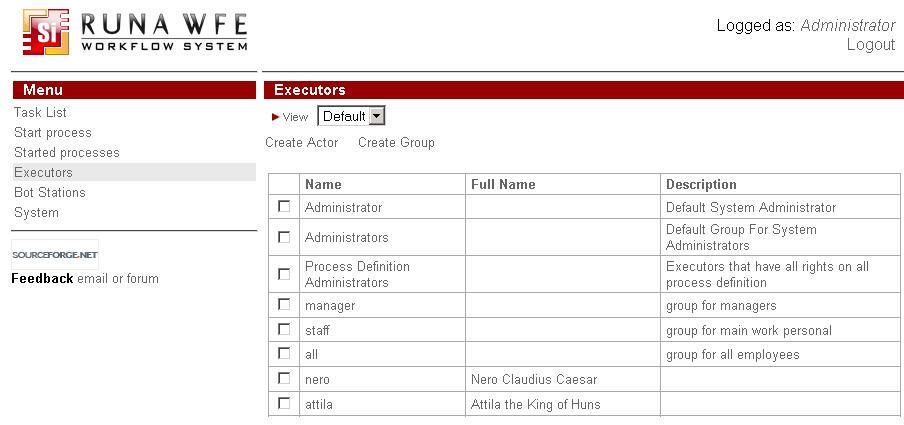
Click on the menu item “Executors”
Using “Create Group” command create the following groups:
- manager
- staff
- all
Using “Create Actor” command create the following actors:
- nero
- attila
You’ll see the following:
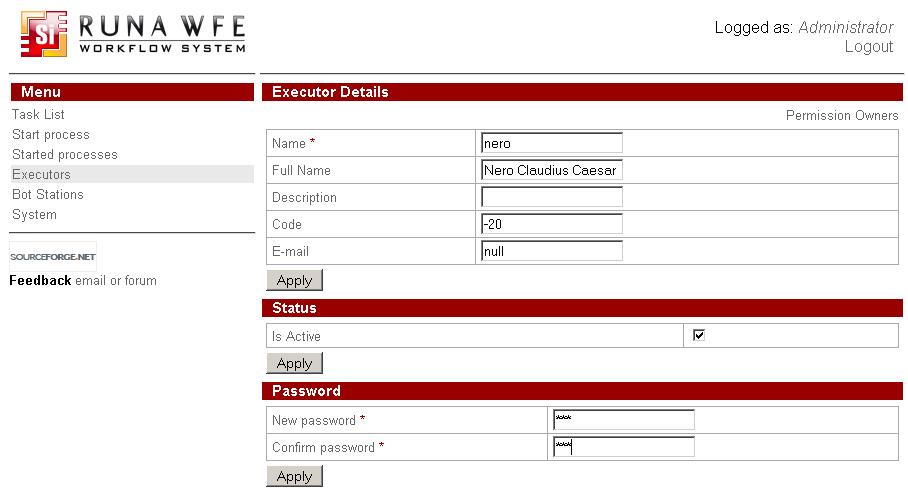
Set password 123 for users nero and attila
Add actors in groups
| Groups | Group members |
| manager | nero |
| staff | attila |
| all | nero
attila |
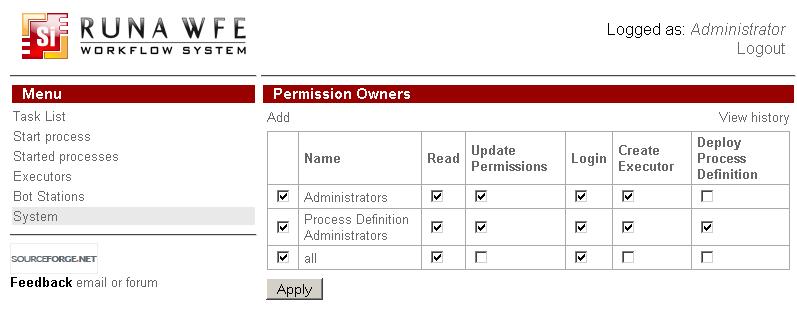
Click the menu item “System”, and give the group all login and read permissions.
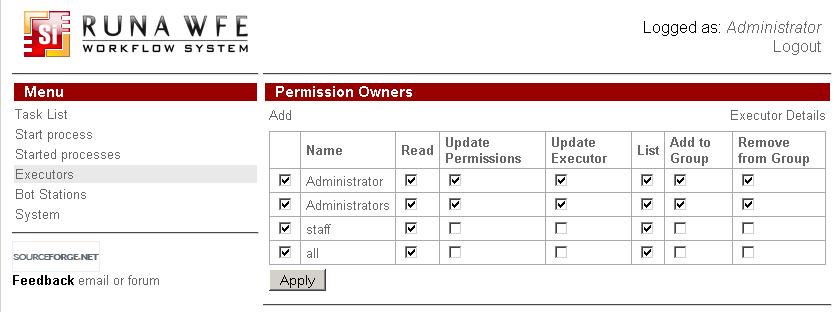
Edit the staff group: select "Executors" from menu then click on "staff" group name. In the upper right corner of executor details click on "Permission owners". Give permission to read and list to the all group.
Give permission to read the all group for every actor. Give permission to read and list the all group for «staff» group.
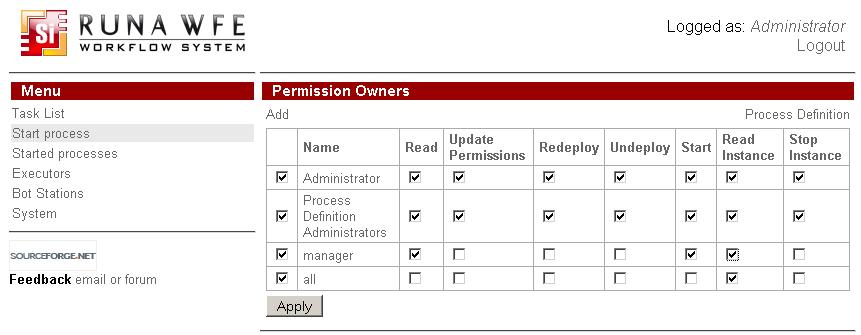
Select "Start process" from menu. Click on “Overtime Work” process "Properties" link. Click "Permission owners" link in the upper right corner. Set the permission “read instance” for all group and permissions “read” and “start” for manager group.
Process running
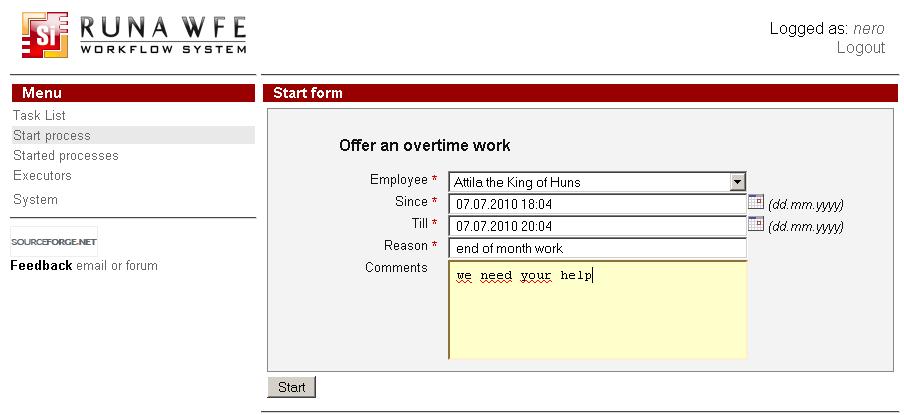
Enter the system as nero (password is “123”). Click the “Start Process” menu:
Click on “Overtime Work” process. Fill the form and click “Start” button.
The process instance will be created. You can see it in the “Started processes" menu.
Enter the system as attila (password is “123”).
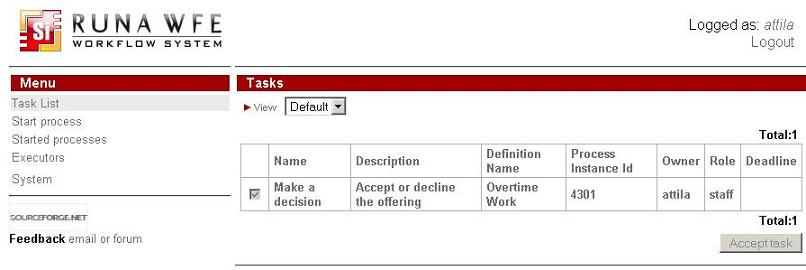
You'll see the task in the tasklist.
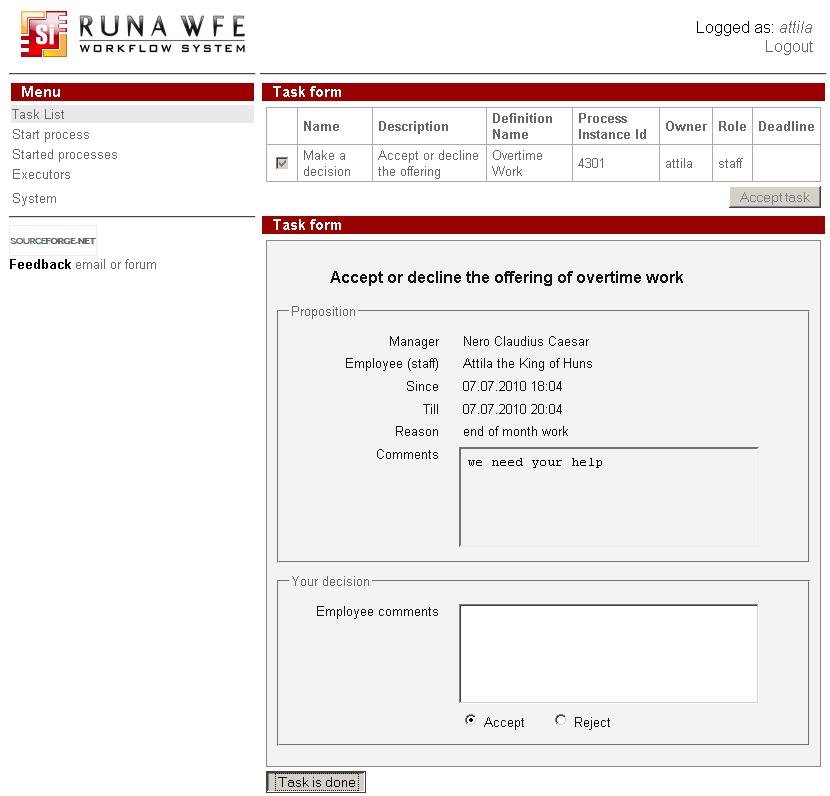
Execute the task.
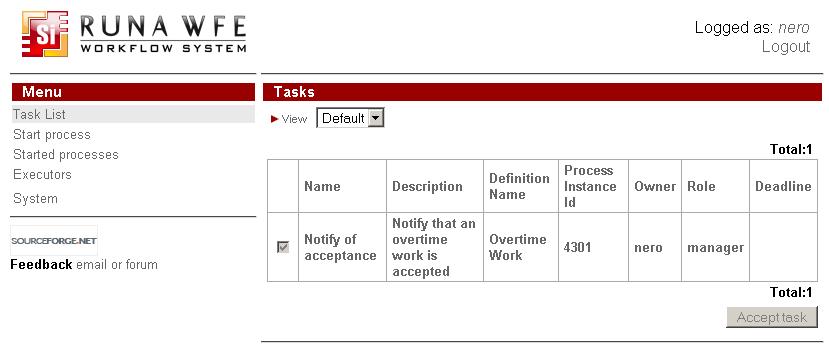
Enter the system as nero. You'll see the task in the tasklist.
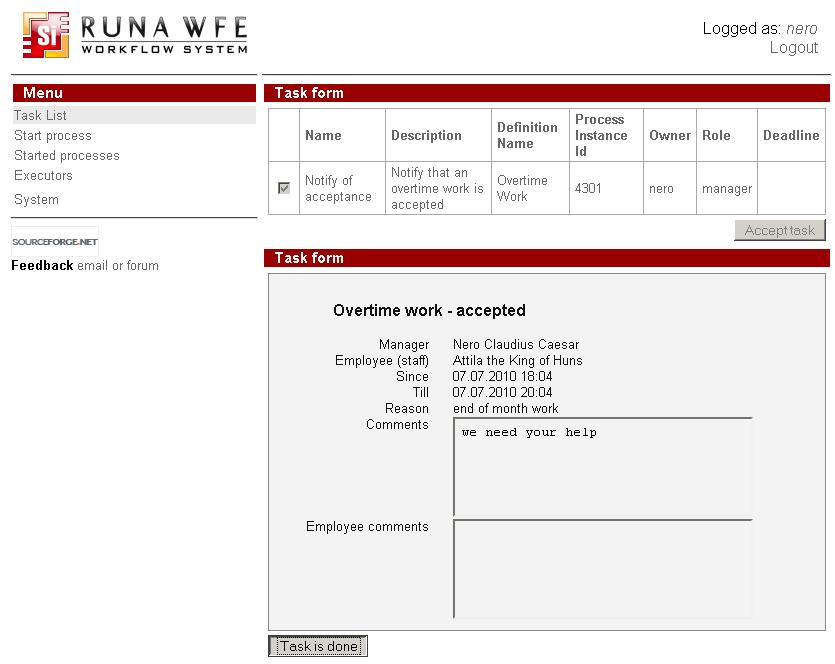
Execute the task.
The business process is finished.
Form validation
Using validation
On the context menu for the form in process diagram click 'Form validation' menu. It will create default validation file with attached 'required' validator for all variables of that form. Customize validation file for your needs. You can optionally use client-side validation for form based on JavaScript. Check menu 'Use JavaScript validation' in the same context menu. It will be accesible after validation file is created.
Concepts
Validators can be categorized by 2 types: Field Validator (checks is the field value is valid) and Non-Field Validator (It’s not attached to field and checks input data over all fields).
If value of the field is null validation of the Field Validator attached to that field accepts until for that field not attached ‘required’ validator.
Base validators
| Validator type | Description + Example |
| date | Validator that checks if the date supplied is within a specific range.
min - the min date range. If not specified will not be checked. max - the max date range. If not specified will not be checked.
<field name="birthday"> <field-validator type="date"> <param name="min">01.01.1990</param> <param name="max">01.01.2000</param> <message>Birthday must be within ${min} and ${max}</message> </field> </field> |
| double | Validator that checks if the double specified is within a certain range.
(if parameter is not specified, it will not be checked) minInclusive - the minimum inclusive value maxInclusive - the maximum inclusive value minExclusive - the minimum exclusive value maxExclusive - the maximum exclusive value
<field name="percentage"> <field-validator type="double"> <param name="minExclusive">0.123</param> <param name="maxExclusive">99.98</param> <message> It needs to be between ${minExclusive} and ${maxExclusive} </message> </field-validator> </field> |
| Validator checks that a given String field is a valid email address.
The regular expression used to validate that the string is an email address is: \\b(^[_A-Za-z0-9-]+(\\.[_A-Za-z0-9-]+)*@([A-Za-z0-9-])+((\\.com)|(\\.net)|(\\.org)|(\\.info)|(\\.edu)|(\\.mil)|(\\.gov)|(\\.biz)|(\\.ws)|(\\.us)|(\\.tv)|(\\.cc)|(\\.aero)|(\\.arpa)|(\\.coop)|(\\.int)|(\\.jobs)|(\\.museum)|(\\.name)|(\\.pro)|(\\.travel)|(\\.nato)|(\\..{2,3})|(\\..{2,3}\\..{2,3}))$)\\b
<field name="myEmail"> <field-validator type="email"> <message>Must provide a valid email</message> </field-validator> </field> | |
| expression | A Non-Field Level validator that validates based on BSH expression supplied.
expression - the BSH expression to be evaluated against the variables (Must evaluate to a Boolean)
<validator type="expression"> <param name="expression"><![CDATA[number > number2]]></param> <message>Failed to meet BSH Expression</message> </validator>
|
| number | Validator that checks if the integer specified is within a certain range.
(if parameter is not specified, it will not be checked) min - the minimum value max - the maximum value
<field name="age"> <field-validator type="int"> <param name="min">20</param> <param name="max">50</param> <message>Age needs to be between ${min} and ${max}</message> </field-validator> </field> |
| regex | Validates a string field using a regular expression.
expression - The RegExp expression REQUIRED caseSensitive - Boolean (Optional). Sets whether the expression should be matched against in a case-sensitive way. Default is true. trim - Boolean (Optional). Sets whether the expression should be trimed before matching. Default is true.
<field name="myStrangePostcode"> <field-validator type="regex"> <param name="expression"><![CDATA[([aAb][123][eEfF][456])]]></param> </field-validator> </field>
|
| required | Checks that field value is not null |
| requiredstring | Validator checks that a String field is non-null and has a length > 0. (i.e. it isn't ""). The "trim" parameter determines whether it will trim the String before performing the length check. If unspecified, the String will be trimmed.
trim - trim the field name value before validating (default is true) <field name="username"> <field-validator type="requiredstring"> <param name="trim">true</param> <message>username is required</message> </field-validator> </field> |
| stringlength | Validator checks that a String field is of a certain length. If the "minLength" parameter is specified, it will make sure that the String has at least that many characters. If the "maxLength" parameter is specified, it will make sure that the String has at most that many characters. The "trim" parameter determines whether it will trim the String before performing the length check. If unspecified, the String will be trimmed.
maxLength - The max length of the field value. Default ignore. minLength - The min length of the field value. Default ignore. trim - Trim the field value before evaluating its min/max length. Default true
<field name="myPurchaseCode"> <field-validator type="stringlength"> <param name="minLength">10</param> <param name="maxLength>10</param> <param name="trim">true</param> <message>Code needs to be 10 characters long</message> </field-validator> </field> |
| url | Validator checks that a given field is a String and a valid URL
<field name="myHomepage"> <field-validator type="url"> <message>Invalid homepage url</message> </field-validator> </field> |
DTD for the form validation file
<?xml version="1.0" encoding="UTF-8"?>
<!ELEMENT validators (field|validator)+>
<!ELEMENT field (field-validator+)>
<!ATTLIST field name CDATA #REQUIRED>
<!ELEMENT field-validator (param*, message)>
<!ATTLIST field-validator type CDATA #REQUIRED short-circuit (true|false) “false">
<!ELEMENT validator (param*, message)>
<!ATTLIST validator type CDATA #REQUIRED short-circuit (true|false) "false">
<!ELEMENT param (#PCDATA)>
<!ATTLIST param name CDATA #REQUIRED>
<!ELEMENT message (#PCDATA)>
<!ATTLIST message key CDATA #IMPLIED>
- ↑ Note:In order to deploy a process you must have Process Definition permission on System (can be granted via system menu).
